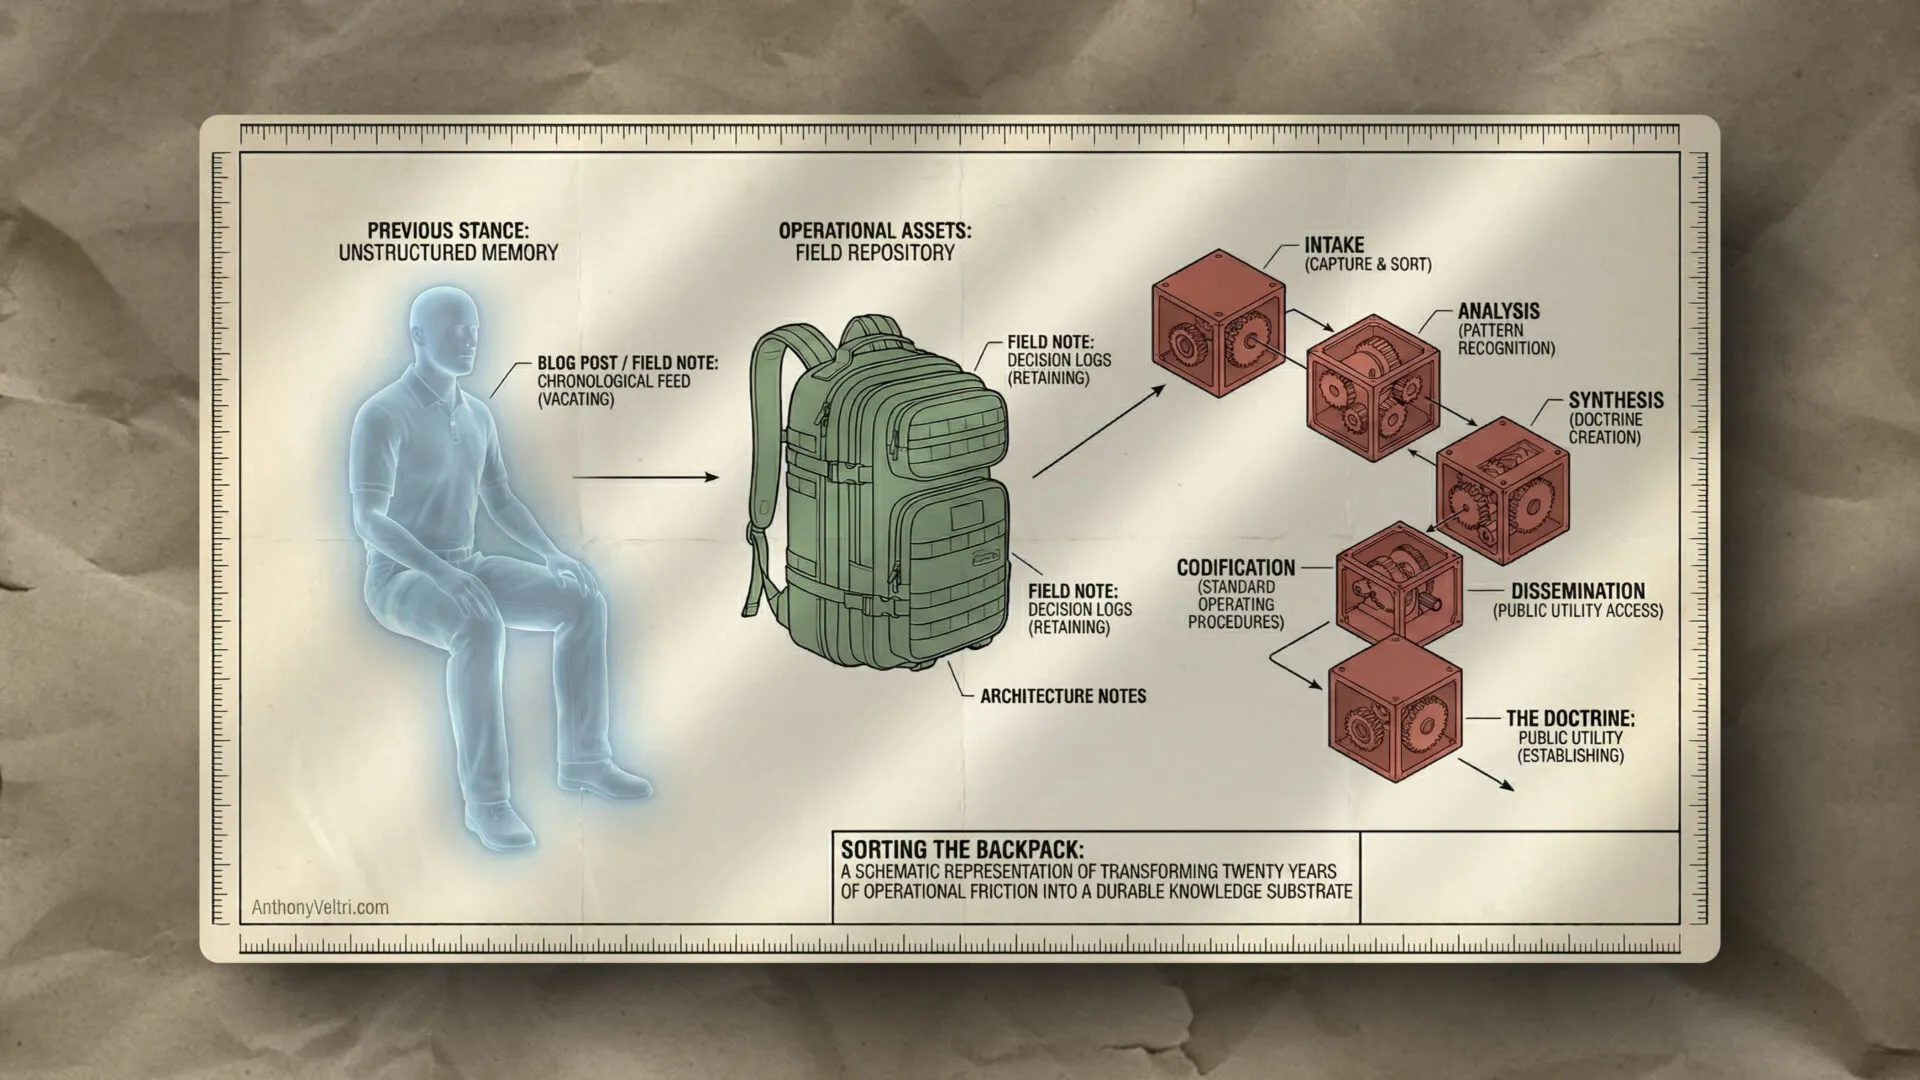
Why decisions must be made at the right altitude to move fast, stay aligned, and avoid unnecessary friction #
Doctrine Claim: Decisions have mass. Strategic choices are heavy and belong at the top. Tactical choices are light and belong at the edge. When you confuse the two: when leaders micromanage formatting or operators wait for permission to fix a typo, the system freezes. This guide defines the four altitudes of authority required to maintain high tempo without losing alignment.
1. Purpose of the Decision Altitudes Model #
Decision making in complex organizations breaks down when:
- people act at the wrong level
- authority is unclear
- escalation is inconsistent
- leadership and operators step into each other’s lanes
- decisions stall while waiting for the wrong person
The Decision Altitudes Model provides a clean structure for:
- who decides
- where they decide
- what they decide
- when they decide
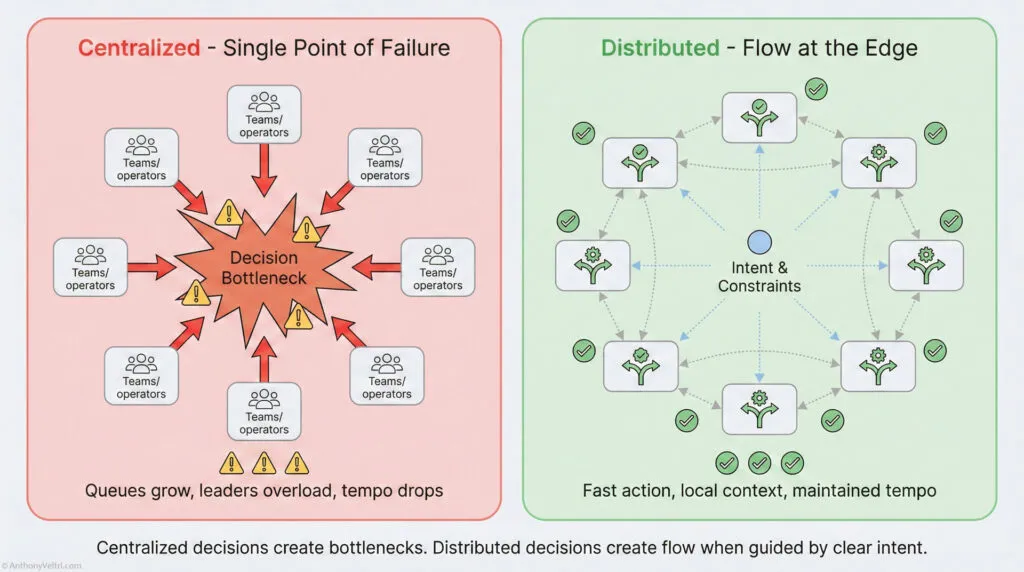
This model makes distributed decisions possible, reduces decision drag, and protects mission tempo.
2. The Four Decision Altitudes #
The system has four decision altitudes.
Each must operate cleanly for the system to function.
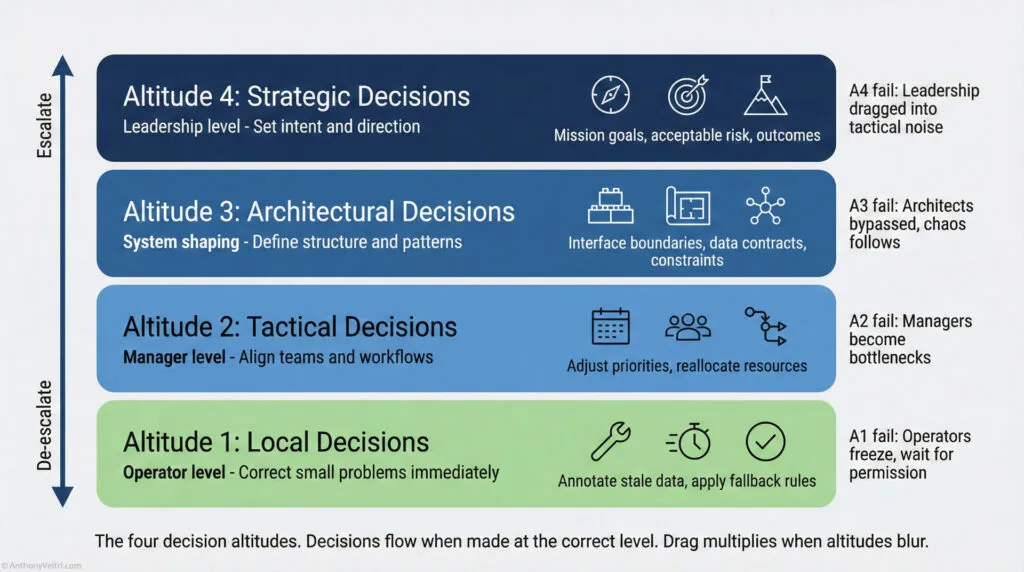
The Decision Altitude Escalation Ladder #
Altitude 1: Local Decisions (Operator Level) #
Purpose: Correct small problems immediately at the point of action.
These decisions include:
- annotating stale data
- making minor corrections
- adjusting workflows
- clarifying a technical detail
- applying predefined fallback behavior
- preventing a small issue from escalating
Operators decide because:
- they see the problem first
- they understand the immediate context
- the cost of waiting is too high
Failure mode:
Operators wait for permission, causing delays, drag, and avoidable escalation.
Altitude 2: Tactical Decisions (Manager Level) #
Purpose: Align teams, workflows, and timelines.
These decisions include:
- adjusting priorities
- reallocating resources
- harmonizing partner expectations
- reviewing process changes
- triaging work across teams
Managers decide because:
- they understand system flow
- they control allocation
- they see cross team friction
- they own workflow health
Failure mode:
Managers micromanage operators or act like strategists, causing drift and confusion.
Altitude 3: Architectural Decisions (System Shaping Level) #
Purpose: Shape the structure, patterns, and constraints of the system.
These decisions include:
- interface boundaries
- data contract design
- schema consistency
- risk thresholds
- fallback principles
- federation shapes
- evolution path
- change management rules
Architects decide because:
- they see the whole system
- they understand coupling
- they know which constraints matter
- they design for both prevention and contingency
- they protect tempo and reduce drag
Failure mode:
Architects are bypassed and technical decisions become political decisions, creating instability.
Altitude 4: Strategic Decisions (Leadership Level) #
Purpose: Set intent, define direction, and select the outcomes that matter.
These decisions include:
- mission goals
- definition of success
- acceptable risk
- portfolio prioritization
- organizational boundaries
- long term commitments
Leadership decides because:
- they carry strategic accountability
- they must align resources
- they shape the environment teams operate within
Failure mode:
Leadership dictates operator level decisions or changes requirements without understanding impact.
3. Why Decisions Must Stay in Their Lane #
Every altitude exists for a reason.
When altitudes blur:
- operators escalate unnecessarily
- managers become bottlenecks
- architects get overridden
- leadership gets dragged into tactical noise
- strategic decisions collapse into daily firefighting
- conflict increases
- morale drops
- decision drag multiplies
When altitudes are clear:
- people act quickly
- alignment is stronger
- escalation is clean
- authority is respected
- tempo is protected
A healthy system routes decisions to the correct altitude instinctively.
4. Decision Altitude Failures in Real Environments #
FRN Example: Leadership acting at Altitude 1 #
FRN failures often came from leadership operating at the wrong altitude:
Leadership at altitude 4 added fields:
- based on personal preference
- during revision cycles
- without evaluating downstream impact
But these were local-level decisions altering:
- schema
- formatting
- operator workload
- workflow timing
Wrong altitude → chaos.
Once your team reset altitudes:
- leadership defined intent
- managers owned workflow
- editors owned correctness
- legal reviewers owned compliance
The system stabilized instantly.
iCAV Example: Operators forced into Altitude 3 decisions #
In early iCAV cycles, analysts were forced into architectural decisions:
- changing ingest logic
- altering fallback patterns
- adjusting harmonization rules
This was the result of unclear altitude boundaries.
When architecture reclaimed those decisions:
- analysts focused on real time correctness
- architects focused on stability and evolution
- managers focused on throughput
- leadership focused on mission outcomes
Tempo increased, friction fell.
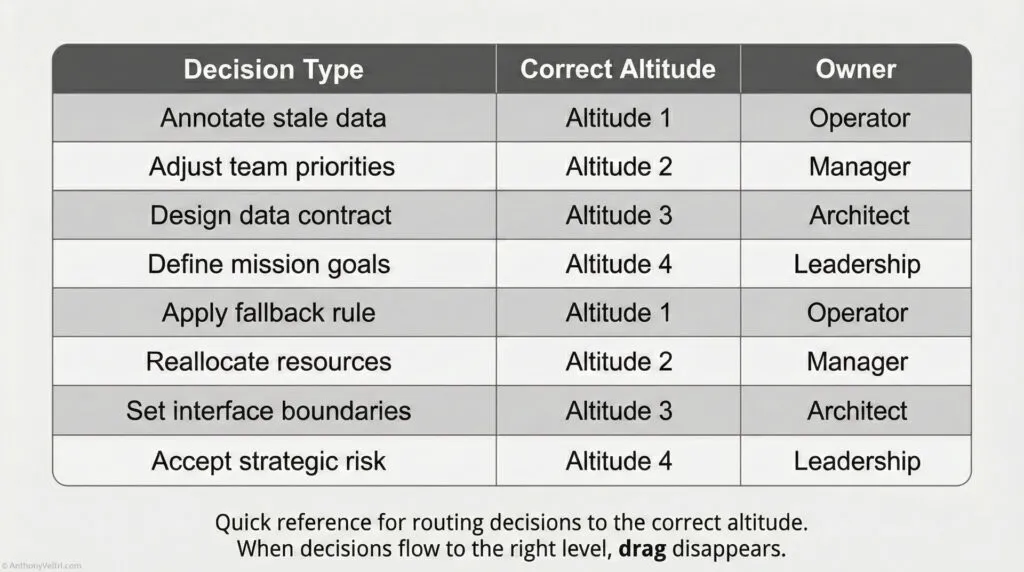
5. The Decision Altitude Test #
Whenever a decision appears, ask:
Which altitude does this belong to?
If the wrong person is deciding, move it.
Example questions:
- Does this require immediate correction? → Altitude 1
- Does this affect workflow or resource allocation? → Altitude 2
- Does this change system shape, boundaries, or patterns? → Altitude 3
- Does this affect our mission, risk, or strategic direction? → Altitude 4
This test prevents 80 percent of decision drag.
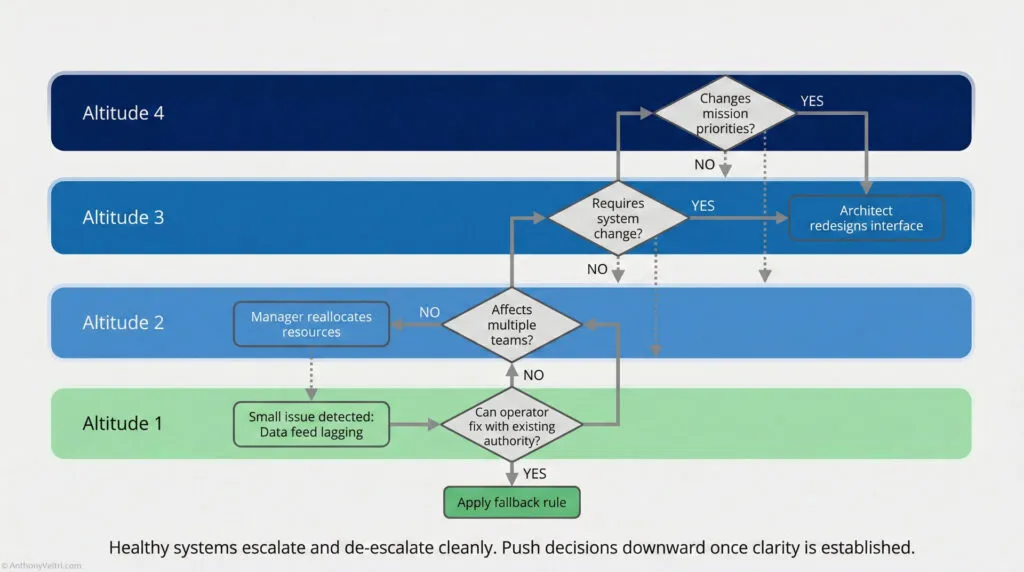
6. The Altitude Escalation Ladder #
Healthy systems escalate and de escalate decisions cleanly.
Start at Altitude 1 #
Operators solve small problems immediately.
Escalate to Altitude 2 #
Only if the issue affects timelines, resources, or cross team flow.
Escalate to Altitude 3 #
Only if the issue affects boundaries, interfaces, or architecture.
Escalate to Altitude 4 #
Only if the issue affects mission intent or strategic direction.
De escalate when possible #
Push decisions downward once clarity is established.
This pattern prevents accidental drift upward.
7. Decision Altitude Template (Paste Ready) #
Decision Altitude Template
Decision:
Describe the decision.
Correct Altitude:
1 / 2 / 3 / 4
Why This Altitude:
Explain the reasoning.
Owner:
Operator / Manager / Architect / Leader
Escalation Path:
Step 1:
Step 2:
Step 3:
Intent:
What this decision must achieve.
What must not be violated.
Impact:
Local, cross team, architectural, strategic.
8. Cross Links #
Decision altitudes connect directly to:
- Principle 16: Distributed decisions
- Principle 17: Clear intent
- Principle 19: Commitment over compliance
- Principle 20: Leadership vs management vs supervision
- Annex A: Human contracts
- Annex C: Interface ownership
- Annex E: Prevention–contingency matrix
Decision altitudes are the backbone of your command philosophy.
9. For Reflection: #
Ask yourself:
Who is making decisions at the wrong altitude?
Where is leadership dragged down?
Where are operators frozen?
Where are managers bottlenecking?
Where are architects bypassed?
Fix the altitude.
Restore the flow.
Last Updated on December 5, 2025